I’m opening this topic on behalf of @imranhsayed and @smit.soni22 because they want to work on a Frontity package that will add support for Contact Form 7 in Frontity.
It’s probably worth noting here that Frontity is different to other React frameworks like Gatsby or NextJS. In those frameworks, the steps involved to integrate a WP plugin like CF7 will usually be something like:
- Add a contact page in your theme/app.
- In that page, create new React components for the form.
- When the form is submitted, fetch manually the CF7 endpoint.
- In the settings of your app, add the ID of the form you want to point to.
That’s not the way things work on Frontity and the purpose of this topic is to teach how to create a package. It’s totally our fault that this information is not available yet in our docs but I hope people can check this topic for reference.
If you want to work on another Frontity package, please open a new topic and we can discuss the best possible implementation.
Frontity’s design goal is to make things work out of the box with WordPress. Ideally, this package will allow any contact form you create on any WordPress post or page to work without any problem, just like it does in any PHP theme.
How to structure your project
You can develop a package inside a Frontity project. This is not only possible, but recommended. You can easily publish the package to npm once it’s ready from its own folder:
cd packages/my-awesome-package
npm publish
That way, anyone that wants to contribute to the package can do so by just cloning the Frontity project, doing npx frontity dev and making the necessary changes.
If you’re package is not a theme, you should not have your theme installed as a local package. Move it instead to node_modules. The only local package should be the one you’re developing. That will avoid confusion and will help with future updates.
The package.json dependencies of your Frontity project should look like something like this:
  "dependencies": {
    "@frontity/core": "^1.2.1",
    "@frontity/html2react": "^1.1.11",
    "@frontity/mars-theme": "^1.2.0", // <- your theme is on node_modules
    "@frontity/tiny-router": "^1.0.14",
    "@frontity/wp-source": "^1.3.1",
    "frontity": "^1.3.1",
    "my-awesome-package": "./packages/my-awesome-package"
  }
The package.json of your package is the one inside your package’s folder (/packages/my-awesome-package). It should have the name and information you want to be used when publishing the package to npm.
How does Contact Form 7 work
- After you install the CF7 WP plugin, there’s a new custom post type in your WP dashboard called “Contact Form”.
- You can create any number of contact forms in your dashboard and you receive a shortcode for each one.
- When you include the shortcode in a post or page, a
<form>appears in the content of that post/page. - Besides that, a new JS file and a new CSS file is added to your theme.
- When a user sends a form, the JS code captures the submission and sends the info to a new REST API endpoint exposed by CF7: https://domain.com/wp-json/contact-form-7/v1/contact-forms/:id/feedback
- The id of the URL is the form (custom post type) and the info sent is what the
<form>has. For example:
_wpcf7: 1922
_wpcf7_version: 5.1.4
_wpcf7_locale: en_US
_wpcf7_unit_tag: wpcf7-f1922-p1925-o1
_wpcf7_container_post: 1925
name: Name
email: some@email.com
subject: The subject...
message: The message...
- I believe this is just
form-data, taken directly from the form. Content-type ismultipart/form-data. Maybe it works withapplication/jsonas well. - The fields starting with
_wpcf7are hidden fields already present on the<form>of the content.
- As far as I know, there’s no need for authentication when sending the form.
- The response of the REST API endpoint contains both errors or the thank-you message, for example:
Validation error:
into: "#wpcf7-f1922-p1925-o1"
invalidFields:
  0:
    idref: null
    into: "span.wpcf7-form-control-wrap.email"
    message: "The e-mail address entered is invalid."
message: "One or more fields have an error. Please check and try again."
status: "validation_failed"
Successfully submitted:
into: "#wpcf7-f1922-p1925-o1"
message: "Thank you for your message. It has been sent."
status: "mail_sent"
- All these validation/success messages can be edited in the WP Dashboard.
Implenentation proposal
This is my initial proposal for a “zero-configuration” package:
Use html2react to process any CF7 <form>
// packages/contact-form-7/src/index.js
export default {
  libraries: {
    html2react: {
      processors: [contactForm7]
    }
  }
}
By the way, our recommendation was to add processors in init, but we have realized you can do it directly in libraries, so we think it’s cleaner. This was the equivalent:
// packages/contact-form-7/src/index.js
export default {
  actions: {
    cf7: {
      init: ({ libraries }) => {
        libraries.html2react.processors.push(cf7Form);
      }
    }
  }
}
The processor can look something like this:
const cf7Form = {
  name: "cf7Form",
  test: node => node.component === "form" && node.props.className === "wpcf7-form",
  process: node => {
    node.component = Form;
    return node;
  }
};
Now, we have the whole form in React, with our <Form> component.
Use html2react to capture <inputs>
The same way we captured <form>, we can capture all the inputs:
const cf7Inputs = {
  name: "cf7Inputs",
  test: node => node.component === "input" && /wpcf7-form-control/.test(node.props.className),
  process: node => {
    node.component = Input;
    return node;
  }
};
Inputs can use internal state (useState) to retain and modify their value although it may be a better idea to store them in the state, using an object in state.cf7.forms[id].values.
Add that processor to the array:
// packages/contact-form-7/src/index.js
export default {
  ...
  libraries: {
    html2react: {
      processors: [cf7Form, cf7Inputs]
    }
  }
}
Use the <Form> component to submit the form
- Capture the
onSubmitand trigger an action with theevent.targetdata. - That action (for example,
actions.cf7.sendForm) will fetch the endpoint https://domain.com/wp-json/contact-form-7/v1/contact-forms/:id/feedback with the relevant data. - After receiving the data, it can use
state.cf7.forms[id]to add relevant information to the state, for example, a flag to control if there’s any error or if it succeed, and the messages received from the REST API. For example:
export default {
   ...
   actions: {
     cf7: {
       sendForm: ({ state }) => async data => {
         const res = await fetch(`https://domain.com/wp-json/contact-form-7/v1/contact-forms/${data}/feedback`);
         const body = await res.json();
         // Populate state with the errors, or thank-you message...
         state.cf7.forms[data.id].message = body.message;
         if (body.mail_sent) {
            state.cf7.forms[data.id].status = "sent";
            state.cf7.forms[data.id].message = body.message;
         } else if (body.validation_failed) {
            state.cf7.forms[data.id].status = "failed";
            // Populate errors from the response so React components
            // can see them and re-render appropriately...
            state.cf7.forms[data.id].validationErrors = {
               email: "The e-mail address entered is invalid."
            };
       }
     }
   }
}
- If the form was successfully submitted, it can show the thank-you message.
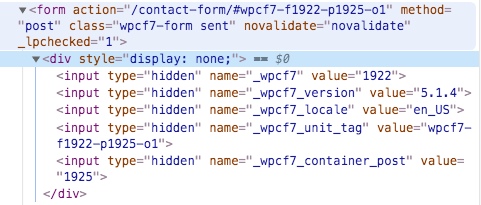
How to get the ID of the form in the <Form> component
The id is inside a hidden field with this structure. It’s the first children of the first children:
<form action="..." method="post" class="wpcf7-form">
  <div style="display: none;">
    <input type="hidden" name="_wpcf7" value="1922">
In the html2react processor you can easily iterate over the children, than extract the id and pass it as a prop the the <Form> component:
const contactForm7 = {
  name: "contactForm7",
  test: node => node.component === "form" && node.props.class === "wpcf7-form",
  process: node => {
    // Get the id from the hidden field.
    // It's the first children of the first children:
    const id = node.children[0].children[0].props.value;
    // Pass the id as a new prop to <Form>.
    node.props.id = id;

    // Change from <form> to our React component <Form>.
    node.component = Form;

    return node;
  }
};
Then, you can use that id to access state and show either the success message, the form (children) or the form with the failure message:
const Form = ({ state, id, children }) => {
  const form = state.cf7.forms[id];

  return form.status === "sent" ? (
     <div>Success: {state.cf7.forms[data.id].message}</div>
    ) : (
     <>
       {children}
       {form.status === "failed" && <div>Something wrong: {state.cf7.forms[data.id].message}</div>}
     </>
}
How to pass down the ID of the form to the children <Input> components
You can use React context for that.
export const FormIdContext = React.createContext(null);

const Form = ({ state, id, children }) => {
  const form = state.cf7.forms[id];
  return (
    <FormIdContext.Provider value={id}>
      ...
    <FormIdContext.Provider />
  );
}
Then use the context in the <Input> components:
import { FormIdContext } from "./Form";

const Input = ({ state, actions, name }) => {
  const id = React.useContext(FormIdContext);
  const onChange = event => {
    actions.cf7.changeInputValue(id, name, event.target.value);
  };

  return (
    <input onChange={onChange} ... />
  );
}
Show invalidation errors
You can create styled components with the CSS styles of CF7 and use the more html2react processors to insert them.
After receiving in the <Form>:
invalidFields:
  0:
    idref: null
    into: "span.wpcf7-form-control-wrap.email"
    message: "The e-mail address entered is invalid."
You can add that message to the state, using the id of the form:
state.cf7.forms[id].validationErrors = {
  email: "The e-mail address entered is invalid."
}
Then add yet another processor for wpcf7-form-control-wrap with access to the id (via context) and name (it’s in its class) and turn it red if it finds an error.
const cf7Spans = {
  name: "cf7Spans",
  test: node => node.component === "span" && /wpcf7-form-control-wrap/.test(node.props.className),
  process: node => {
    node.component = Span;
    return node;
  }
};
const Span = ({ className, state, children }) => {
  // Get the name from the class
  const name = className.split(" ")[1];
  // Get id from context
  const id = useContext(FormIdContext);
  // Get error from the state.
  const error = state.cf7.forms[id].validationErrors[name];

  return (
    <span css={css`background-color: ${error ? red : white};`}>
     {children}
    </span>
  );
};
Please bear in mind that this is just an implementation proposal, not the final one. I haven’t tested any code. If you find problems or something is not clear enough, please reply to this topic and we can discuss it further and find the best solution together.
Installation
Any form created with CF7 and included with a shortcode in any post/page should work out of the box by simply installing the package. The only steps involved would be:
- Install the package from npm:
npm install contact-form-7
- Add it to your
frontity.settings.jsfile:
export default {
  ...
  packages: [
    "contact-form-7", // <-- add it to your packages
    "your-theme",
    "@frontity/tiny-router",
    "@frontity/html2react",
    ...
  ]
};
That’s it.
As long as the theme is using html2react, it should work.
Additional features: reCaptcha
CF7 has support for reCapatcha v3. That’s something worth exploring in the Frontity package as well, although maybe it will be better managed by a separate Frontity package that can add reCaptcha to any page of the site (not only to CF7).
Additional features: expose actions to send forms programatically
The methods used by this package can be exposed in actions so people who want to send a form programatically from other parts of their theme can do so by simply doing:
actions.cf7.sendForm({
  id: X,
  fields: { ... } // name, surname... whatever form with id X needs.
});
Additional note: fetch vs axios
It’s worth noting here that for this type of package that you should not use an external fetch library, like axios or superagent. Axios is 12.6kB and SuperAgent is 20.4kB. If each Frontity package adds its own favourite fetch library people will end up with many fetch libraries and many extra Kbs in their apps.
You should stick to fetch, which is included in Frontity by default and it weights 0Kbs, because it’s a native library. Do not use window.fetch because that’s won’t work on Node. Import it from the frontity package:
import { fetch } from "frontity";

const getFromSomeAPI = async (resource) => {
  const response = await fetch("https://site.com/api/v1" + resource);
  const body = await response.json();
  return body;
};
It’s explained in more detail here:
 Its remarkable.

 Announce the

